Seat belt relay-timer

This area is open to"How-To" section only for tutorials on fixes, etc. (no profanities/etc.). NO FOR SALE POSTINGS

Moderator: redstangbob

Post Reply
User avatar
redstangbob
Posts: 3604
Joined: Fri May 02, 2008 4:06 pm
Location: 40 miles east of Wixom

Seat belt relay-timer

Post by redstangbob »

I cut and pasted a post from tbird (Jim Mills) and hope the images are large enough for anyone that wants to build one of these pieces. Thanks Jim, you've probably saved someone a lot of headaches by showing this work-around. ;-)

This instruction diagram and photo was provide to me in 2002 by Terry Webb from Eastern Canada he is a member of the tbird.org forum I have not tried this but Skip Clark did. Got a PM requesting the info that I sent to Skip so thought I would post it here Maybe Dan should move this to our new tech area.
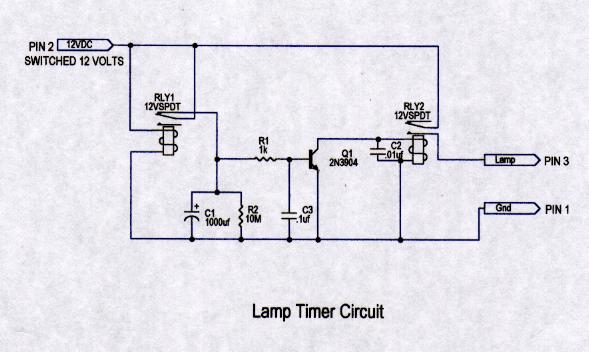
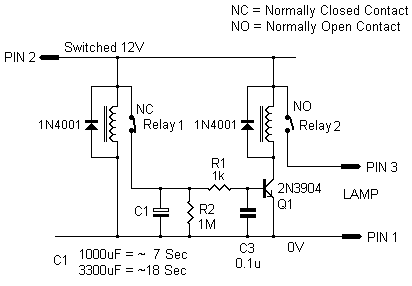
Sorry for the delay in sending this. I don't have a good program for drawing these things, and when I asked for help, I was told that the circuit was wrong (even thoug it did work). So we've now fixed it, but the drawing leaves a lot to be desired.
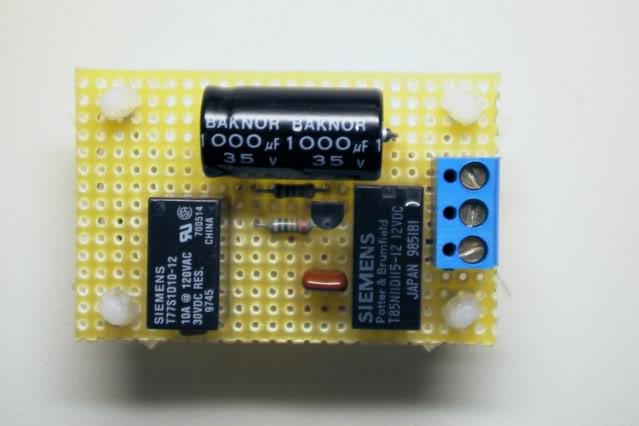
The components are:
RLY1 and RLY2 - SPDT 12v relays
R1 - 1K resistor
R2 -10M resistor
C1 - 1000uf capacitor
C2 - 0.01uf capacitor
C3 - 0.1uf capacitor
Q1 - 2N3904 transistor

All these are mounted on a little circuit board about 1 1/2 by 2 1/2 inches along with a little terminal block. The wire to the seat belt light was cut and run to pin 2 (switched 12 v in) and then out at pin 3 to the lamp. Pin 1 was connected to ground.

When the car is started, the circuit loads and the values of the capacitors keep the lamp lit for 15 seconds. The lamp then goes out and the relays reset for the next time. Once I had it working, I globbed it up with silicone and mounted it with a tie-wrap against the side of the tunnel underneath the console.

It's not the most elegant solution, but it works, and if someone wanted to spend the time, it could be cleaned up a bit more.

I have attached the scan of the circuit and a photo of the board before I encased it in silicone.
Terry

Image
Image
It's gonna be cool when it's done
And now it's really cool !!


59 convertible
58 convertible
65 hardtop
john5769
Posts: 1
Joined: Fri Nov 11, 2011 3:14 pm

help with timer circuit

Post by john5769 »

I'm doing something wrong and the circuit not working. I have all parts on list and in the right place, but I'm using a breadboard to test the circuit. Did u have any problem getting it to work
John
Andrew52
Posts: 2
Joined: Fri Nov 11, 2011 11:44 pm

Re: help with timer circuit

Post by Andrew52 »

john5769 wrote:I'm doing something wrong and the circuit not working. I have all parts on list and in the right place, but I'm using a breadboard to test the circuit. Did u have any problem getting it to work
John
Hi John,

the circuit wont work as shown... so you havent made a mistake :)

Relay 2 will never activate as its not getting any power supply. it needs instead to be moved and placed between +12V line along the top and its other end to the collector of Q1. Remove the C2 capacitor from across it and replace the cap with a 1N4001 diode, this will provide back EMF protection. The "pointy end" of the diode should go to the +12V rail.

The other problem with relay1 is it switches instantly that 12V is applied,
this probably wont give C1, 1000uF cap time to charge.

unfortunately I cant post images so at this stage i cant show you the modified circuit


cheers
Dave
User avatar
redstangbob
Posts: 3604
Joined: Fri May 02, 2008 4:06 pm
Location: 40 miles east of Wixom

Post by redstangbob »

Andrew52 (Dave), if you could help with this timer we would all appreciate it. There's a how to for help with pictures here http://www.vintagethunderbirdclub.org/p ... php?t=4120 If you need anything else just shoot a PM. Thanks, Bob C
It's gonna be cool when it's done
And now it's really cool !!


59 convertible
58 convertible
65 hardtop
Andrew52
Posts: 2
Joined: Fri Nov 11, 2011 11:44 pm

Post by Andrew52 »

redstangbob wrote:Andrew52 (Dave), if you could help with this timer we would all appreciate it. There's a how to for help with pictures here http://www.vintagethunderbirdclub.org/p ... php?t=4120 If you need anything else just shoot a PM. Thanks, Bob C
Hi Bob,
i will try again, I had assumed it was cuz I hadnt done enough posts that I couldnt post an image, as with many other forums :)
but ahhhh i discover that you cant upload pic to this forum... OK will load it to my www site and link to it :)

http://www.sydneystormcity.com/Delayed%20RelaySW.GIF

Altho the diode isnt essential across Relay 1 it is across Relay 2
It protects the transistor against back EMF spikes generated by the relay coil. Its just really good electronics practice.
As noted on the diagram, with the original 1000uF, there will be ~ 7 sec of delay. Doubling the capacitance will roughly double the delay. ie. the 3300 uF will give ~ 17-18 sec delay

hope this helps :)

cheers
Dave

PS I couldnt use dave as a login so used my second name and age ;)
PPS OK that didnt work will try again
PPPS OK I give up... none of the tags are working for me ... not even when I quoted your post, Bob
just copy and paste my link into your browser :)
for some reason this forum doesnt like me lol
User avatar
redstangbob
Posts: 3604
Joined: Fri May 02, 2008 4:06 pm
Location: 40 miles east of Wixom

Post by redstangbob »

This is the schematic Dave has drawn up, thanks for that! Welcome to the Forum Dave, and tell us about your car(s) and interests.

Image
It's gonna be cool when it's done
And now it's really cool !!


59 convertible
58 convertible
65 hardtop
User avatar
Lee Craner
Posts: 114
Joined: Sat May 04, 2019 11:42 pm
Location: Las Vegas, NV

Re: Seat belt relay-timer

Post by Lee Craner »

I can vouch for Dave's redrawn schematic, I just completed this circuit and it works great. I had to change the large capacitor to 2200 uF to get the light to stay on for 17 sec (the 3300 uF I tried at first kept the light on for 25 sec).
Lee
1965 Red Thunderbird Convertible
1973 Intermeccanica Squire SS-100
1956 Continental Mark II
Post Reply