There's more than one way to skin this particular cat, but Dave (bigbrownpilot) and I have collaborated on a PDF guide (much of the material comes directly from this thread: http://www.vintagethunderbirdclub.net/p ... 99&start=0 ) but with added material, thoughts, comments, etc. The PDF was authored by myself and Dave (bigbrownpilot) and we hope it will be useful to you regardless of how you decide to tackle your disk brake conversion. Please read through the thread as well, many of the member comments are useful and additive to the topic and worth the read. Finally, a big thanks to Tom (ABQTBird) for hosting the more extensive and detailed PDF for us on his site. You can download the PDF here: http://www.southsandia.com/forum/websit ... _Guide.pdf
Please feel free to contact (PM) myself (Treozen - Allan) or Dave (bigbrownpilot) with questions on our experience, and most of all, good luck with your disk brake conversion - however it is you do it!
Allan.
61-63 Disc Brake Conversion
Moderator: redstangbob
61-63 Disc Brake Conversion
Current Classic Garage (or money pits):
1957 Chevy Belair
1963 Thunderbird
1978 Corvette
1979 Ford F250
Prior Money Pits:
1976 Camaro
1983 Jaguar XJ6 (converted)
1966 Cadillac
1957 Chevy Belair
1963 Thunderbird
1978 Corvette
1979 Ford F250
Prior Money Pits:
1976 Camaro
1983 Jaguar XJ6 (converted)
1966 Cadillac
-
redstangbob

- Posts: 3604
- Joined: Fri May 02, 2008 4:06 pm
- Location: 40 miles east of Wixom
Right - they really ought to save the paper and not bother.72fetter wrote:I just received the kit and saw the laughable instructions
Current Classic Garage (or money pits):
1957 Chevy Belair
1963 Thunderbird
1978 Corvette
1979 Ford F250
Prior Money Pits:
1976 Camaro
1983 Jaguar XJ6 (converted)
1966 Cadillac
1957 Chevy Belair
1963 Thunderbird
1978 Corvette
1979 Ford F250
Prior Money Pits:
1976 Camaro
1983 Jaguar XJ6 (converted)
1966 Cadillac
Thanks to the PDF posted by Allan, Dave and Tom, we're going ahead with a conversion that uses a plate to attach the caliper bracket, ala the ACC conversion, and '68-'72 Mustang rotors that are used with various other conversions. However, we're going to use the calipers for full size GM's, and D614 police package pads.
The pads are much larger than the ones supplied with the big bore metrics from CPP, and the bigger calipers have sufficient clearance with 14" wheels. The CPP calipers needed to be ground down about 3/32", something the new owner and I didn't want to do.
One thing we noticed, was that having enough room for the cotter pin was an issue, both in the PDF, and earlier posts by other members. By using washers under a Mustang rotor, we determined that the spindle spacer should be 7/16" thick if a 1/16" thick thrust washer is used, or 3/8" for a 1/8" thick washer.
We were all set to get a conversion that supplied only the spacers and ACC type caliper brackets for $220 on Ebay. Then it would have been just a matter of fabricating brackets for the larger calipers. However, I found a cheaper alternative. I got spacers for early Ford spindles for $43. A friend with a machine shop widened the opening to 1.249", and ground the bases down to 7/16" for $30. A 1' length of 3/4" OD x 3/8" ID tube for spacers, was $5. There was a pair of weld-on rear big GM brackets that aren't cut too deep for $29 on ebay. It looked real easy to modify weld-on metrics for the plate that bolts to the outside of the spindle. I got those for $11 locally. $102 saved, and I get to cut stuff up.
Estimated cost of rotors is $120, quality is mid-range. Timken bearings and seals, hoses, prop valve, and hardware, is estimated at another $175. New calipers are $130, and the pads are another $44. Total is $587. $212 more than the Granada/S10 conversion, but about half is offset by not having to buy new wheels. Plus, the piston in the big caliper is 3/16" larger than the big bore metrics, and the pads are MUCH bigger than the oversize pads supplied with CPP calipers, and 1/16" thicker. My brake guy says these pads will provide much better heat transfer than the CPP pads. On the other hand, he thinks the new owner was crazy to have passed on the '65-'66 conversion I was preparing to install.
The usual other costs involved include new lines, which I already bought before I sold the car, and a new MC and booster. The new owner isn't sure which way he wants to go, but there's plenty of time for that.
I have a pic that shows the difference in pads. On top are the CPP oversize metric pads, the bottom are D614 pads, which fit the GM D52 calipers:
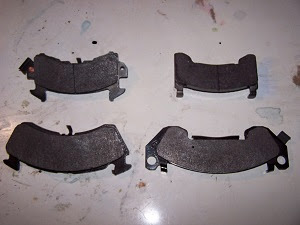
That pic of the pads was the last pic I was able to upload. Still working on solutions, when I do I'll post the pics of the progress.
I made the first caliper bracket mainly both brackets by trial and error. I cut the bracket enough to fit behind the spindle, then traced where it needed to be trimmed. It wasn't difficult, got it on the first try. Using the caliper pins, I connected both brackets together, making the cut bracket a template.
I used a piece of vinyl tile to make a template for the spindle plate, then cut two pieces of 3/8" plate exactly the same. With the pieces clamped together, I drilled three holes to bolt them to the spindle.
One plate was bolted to the spindle, then the rotor was assembled to the spindle. I loaded a caliper with pads, and mounted it to a bracket. it was placed on the rotor with the pads flush with the edge of the rotor. I marked the holes where the bracket connects to the spindle plate. I measured the distance between the bracket and the plate, which is 7/8".
I took the bracket off the caliper, and again, used the pins to connect both caliper brackets, then drilled the 3/8" holes through both. So now I have finished spindle plates and 2 halfway finished caliper brackets.
I used a chop saw that was accurately set to cut square. Four 7/8" spacers were cut. I bolted these to one caliper bracket, I still needed one with no spacers so I could bolt them together to drill the final hole. The spacers were welded to the bracket. When cool, I removed the bolts and installed the spindle plate and caliper bracket, leaving out the bolt that will go through the plate, spindle, and bracket. The distance between the caliper bracket and the back of the spindle was measured at .5695". The hole was marked on the bracket. Again, the brackets were bolted together, and the final holes drilled. At this point, I mirror imaged both brackets, and welded the spacers in place. Now I have a left and a right caliper bracket.
The assembly was installed on the spindle, with the bearing spacer in place. The pic looks just like the one Allan posted, except for the size of the caliper bracket.
After installing the rotor and caliper, I checked to make sure the pads were still even with the edge of the rotor. I realized then that I should have just tack welded the spacers, in case something went off. Luckily, the caliper/rotor relationship is good.
Due to the fact that the spindle is off the car, I couldn't find a way to make sure there was no interference between the caliper and the wheel by spinning the wheel. No problem, it works backwards as well. I bolted a wheel to the rotor, then with the wheel on the bench, spun the spindle. No rubbing at all.
This would have been a lot harder if the spindle was on the car, but it still could have been done.
I had only enough time to upload a few pics before the cable equipment crapped out again, so here goes. This one shows the clearance with the larger D52 caliper. The wheel is a 14x6 late '60's Mustang/Cougar/Fairlane/Falcon/Comet disc brake wheel:

It's not much, but there's actually more room than the Windstar with factory wheels. This next one shows the CPP big bore metric. The pic doesn't show it, but the pins are right up against the rotor. There is no room to fit the caliper without grinding it down:

This one just shows the difference between the standard metric, CPP big bore metric, and the D52 calipers. The piston size of the CPP is 3/16" smaller than the D52, and 1/4" larger than the standard metric. The CPP pads are also larger and thicker than the standard pads, but substantially smaller than the D614 pads that fit the D52 calipers. (As shown in the pic 2 posts up) Standard D52 pads are a little larger than the CPP pads.

I'll post the rest of the pics when the cable guy replaces the equipment.
-
Alan H. Tast

- Posts: 4237
- Joined: Wed Aug 20, 2003 10:52 pm
- Location: Omaha, NE
Re: 61-63 Disc Brake Conversion
I would like to add info to a database regarding what other make/model rims will fit on vintage T-birds.
Wheels
Diameter = ? (at tire bead)
Width = ? (at tire bead)
Overall Diameter = ? (at tire mounting flanges)
Overall Width = ? (at tire mounting flanges)
Backspacing (distance from inside face of rim to mounting face) = ? + backspacing to back side of rim between wheel mounting pad and rim
Offset (distance from center of wheel width to mounting face) = ? & also whether positive (outboard from center line of wheel) or negative (inboard from center line of wheel)
Bolt circle/pattern = ? diameter should be 4-1/2" if fitting on stock hubs
Clear inside diameter (minimum clear distance inside wheel) = ?
Center hub diameter = ?
Wheel mounting pad diameter = ?
For people needing information on rims and brakes, especially when considering larger wheels or performing disc brake conversions, following are stock wheel dimensions for '58-'66 T-birds to use as a starting point in your wheel search.
1958-1963 14x5.5 stock rims, for comparison, were sized as follows:
Diameter = 14" (355.6 mm) at tire bead
Overall Diameter = 15" (381.0 mm) at tire mounting flanges
Width = 5-1/2" (139.7 mm) at tire bead
Overall Width = 6-1/2" (165.1 mm) at tire mounting flanges
Backspacing = 3-7/8" (98.425 mm)*
Offset = 5/8" (15.875 mm)
Bolt circle/pattern = 4-1/2" (114.3 mm)
Clear inside diameter = 12" (304.8 mm)
Center hub diameter = '58-'61 was 2-5/8" (66.675 mm); '62-'63 was 2-7/16" (61.9125 mm)
Wheel mounting pad diameter = ?
*Need dimensions to back side of rim center between wheel mounting pad and rim and outside diameter of wheel center mounting face.
Factory Kelsey-Hayes 14x5.5 wire wheels used on 1962-1963 Sports Roadsters and optional on all 1962-1964 T-birds have the same dimensions except for overall width for the center hub/spinner caps. Dimensions for factory wire wheels will be posted at a later date.
1964 15x5.5 stock rims, which are used with drum brakes:
Diameter = 15" (381.0 mm) at tire bead
Width = 5-1/2" (139.7 mm) at tire bead
Overall Diameter = 16 7/8" (406.4 mm) at tire mounting flanges
Overall Width = 6-1/2" (169.9 mm) at tire mounting flanges
Backspacing = 3-7/8" (98.425 mm)*
Offset = 5/8" (15.875 mm)
Bolt circle/pattern = 4-1/2" (114.3 mm)
Clear inside diameter = 13-3/16" (334.96 mm)
Center hub diameter = 2-7/16" (61.9125 mm)
Wheel mounting pad diameter = ?
*Need dimensions to back side of rim center between wheel mounting pad and rim and outside diameter of wheel center mounting face.
1965-1967 15x5.5 stock rims, which can be used with a '65-'66 disc brake conversion using the large OEM Kelsey-Hayes 4-piston calipers on a 1961-1963 T-bird, were sized as follows:
Diameter = 15" (381.0 mm) at tire bead
Width = 5-1/2" (139.7 mm) at tire bead
Overall Diameter = 16 3/8" (415.9 mm) at tire mounting flanges
Overall Width = 6-5/16" (160.3 mm) at tire mounting flanges
Backspacing = 3-13/16" (96.8 mm); 4-7/8" (123.825 mm) at rim-to-center transition*
Offset =1 3/8" (34.925 mm)
Bolt circle/pattern = 4-1/2" (114.3 mm)
Clear inside diameter = 13-7/16" (341.3125 mm)
Center hub diameter = 2-7/16" (61.9125 mm)
Wheel mounting pad diameter = ?
*Need dimension to back side of depression between rim and wheel center which goes over calipers and outside diameter of wheel center mounting face.
Alan H. Tast, AIA
Technical Director/Past President,
Vintage Thunderbird Club Int'l.
Author, "Thunderbird 1955-1966" & "Thunderbird 50 Years"
1963 Hardtop & 1963 Sports Roadster
Technical Director/Past President,
Vintage Thunderbird Club Int'l.
Author, "Thunderbird 1955-1966" & "Thunderbird 50 Years"
1963 Hardtop & 1963 Sports Roadster
Re: 61-63 Disc Brake Conversion
I have been working on this ACC conversation kit for several years now without success. I recently came across the Wright up done by Allan and Dave. Great information by the way. It mentions to install pad spacers. My kit from ACC didn't not have those spacers. I have been fighting this battle for a long time now. The cars brakes will simply not stop the car in a panic need. It slows the car to a stop but that's it. Could this be the reason, no pad spacers?
Re: 61-63 Disc Brake Conversion
Ramos291 wrote: ↑Sun Oct 23, 2022 9:25 am I have been working on this ACC conversation kit for several years now without success. I recently came across the Wright up done by Allan and Dave. Great information by the way. It mentions to install pad spacers. My kit from ACC didn't not have those spacers. I have been fighting this battle for a long time now. The cars brakes will simply not stop the car in a panic need. It slows the car to a stop but that's it. Could this be the reason, no pad spacers?
Hi Ramos291 I'm not sure if it will make you feel any better, but I've also been fighting with this kit, even long after I sold the car. I sold it to my Uncle years ago, and even just last month we were still trying to get brakes right. We actually fitted another spacer in addition to the one that came with the kit - it helped a bit, but the problem for us is that we're only getting about 500-600 PSI to the front, even with new master, prop valves, etc. - even verified and measured the booster push rod - but no change. I'm starting to think its a matter of pedal ratio, but the booster seems well able to push that push rod out by 1 - 1.5 inches or more - should be enough to get pressures up. Ultimately we got it drivable again, but its not 100%, and not panic-stop worthy.
The reason for the spacer is that the disk supplied with the kit (Granada if I remember correctly) is quite a bit thinner than the s-10 disks that the metric calipers were designed for, and so the spacers take up that extra room. It could be they are using a different disc now, perhaps it doesn't need a spacer, but if you want to try it, you'll have a few options: Search Summit Racing for "Metric Caliper Spacer" and you'll find round ones that fit into the bore (check your bore size when ordering) and flat ones that sit against the bore. Note that the brake pad has a clip that helps keep the pad snug to the piston - I am not 100% sure its actually needed, but the spacers that came with the kit had a gap / notch to accommodate the clip. They are not inexpensive, given how simple they are. Good luck!
Treozen (Allan).
Current Classic Garage (or money pits):
1957 Chevy Belair
1963 Thunderbird
1978 Corvette
1979 Ford F250
Prior Money Pits:
1976 Camaro
1983 Jaguar XJ6 (converted)
1966 Cadillac
1957 Chevy Belair
1963 Thunderbird
1978 Corvette
1979 Ford F250
Prior Money Pits:
1976 Camaro
1983 Jaguar XJ6 (converted)
1966 Cadillac
Re: 61-63 Disc Brake Conversion
Thank you Allan for replying back. It makes me feel a little bit better. At least I know I'm not the only one.( sorry for your struggle too) but does also help me to know to try a spacer and see. A mechanic just told me to buy a more expensive kit at $1200. Or to maybe go back to drum. I don't want to do either but I'm closer to going drum than anything. I mean it's got to be something simple I'd think . Anyway thank you and good luck. Let me know if you find a fix.